There are different options you can use - plain paper, coloured paper, painted paper, oiled paper. No matter what you do, it will work best to have strong paper. Once you start pasting, you will find that paper that disintegrates when it's wet (i.e. most cheap tissue papers) will make your life much more difficult and your lantern-making experience less fun.
If you are going to try some stuff out before you commit to the better quality papers, you can try plain old wrapping paper, but note that the longer the paper fibre is, the stronger your lantern will be, the easier it will be to build without tearing or stiffness, and the longer it will last.
If you don't care if it lasts and/or you're broke or just cheap, tissue paper is thin enough but is very fragile. Be warned.
If you are not a patient tightwad, spring for the better paper. It's so much easier to work with, you'll see the difference right away.
The best kind is Japanese paper, also known as washi - there are many different types, but you don't need to get really expensive stuff. A kozo and sulphite blend called kozuke is good and only a few bucks per sheet from The Paper Place .
If you want to paste some colour on it, that's when you can go to the dollar store and stock up on cheap coloured tissues. Of course, if you get good and want to express subtle beauty in the texture and delicate fibre patterns of the better papers, go for it.
You can also decorate your own paper in a multitude of ways:- Layer coloured tissues
- Apply oil or beeswax in different ways for more translucence. Caution - oiled and waxed papers are extra flammable, be careful!
- Make holes - punch, pierce or cut openings. Run folded paper through a sewing machine with no thread for lines of pierced holes
- Dye papers yourself, using things as simple as food colouring
- Combine wax and dye and batik your paper
- Rubber-stamping or lino block printing
- Stencilling
- Tie-dyeing or fold-dyeing (shibori or itajime in Japanese)
- Use your imagination!
A good thing to remember is that you should use methods that allow light to pass through - thick paint or heavy collage will not work so well for that, although they may create intentional silhouettes, and may look great while the lantern is not lit.
Star lantern
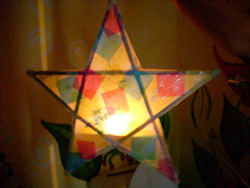 |
Here's a photo tutorial by Kroft on Instructables about making a paper-covered star lantern. |
Pentagon lantern
 |
This polygonal lantern is made entirely of paper. Ten identical pentagons are cut and pasted into a polyhedron - and like magic, you end up with a five-pointed star on each face! This pattern is courtesy of Barry Scientific, where you can also buy an innovative protractor to make all your geometric drawing much easier! Pentagon Lantern Pattern |
How To Make Translucent Papier-maché
You may be familiar with the kind of papier-maché made from newspaper and flour paste, but you can make a more lantern-friendly version that allows much more light through it. Built on a molded clay base, you can make sculptural shapes and then join them together to make larger, solid, three-dimensional shapes. Coated with clear acrylic varnish, the results are moderately water-resistant, so you need not fear a little snow or rain getting on your lantern.
The secret is to use white paper as the base, and diluted white glue as the binder. Chinese brush-painting rolls are good. The paper tears easily with ragged edges, so you can make lots of smallish pieces to layer.
Here's the technique:What you need:
- TIME. This technique will take lots of time - mostly for the drying between layers. You really can't skimp on this or your papier-mache will be too soft and opaque.
- Modelling clay of some kind
- Plastic wrap
- Vaseline
- Paper towels to get the Vaseline off your fingers.
- Chinese brush-painting paper or other easy-to-tear, inexpensive white paper. Chinese brush-painting paper is quite pliable when it's wet but does not disintegrate.
- White glue - Weldbond, Elmers or Bondfast.
- A cup or bowl to mix glue and water.
- Another empty bowl or basket for paper pieces.
- A bristle brush about one inch wide or so to apply glue mix and paper pieces.
- A plastic drop cloth for the table.
What to do
- Shape the clay into the shape you want. If you make more than one, you will be able to produce your complex shapes faster since you need to allow time for the papier-mache to dry between layers. Just use your hands if it's pliable enough, or if it's very stiff clay, tools might be necessary to shape it. Make the surface as smooth as possible.
- Cover the shape with a layer of plastic wrap.
- Spread a very thin coat of Vaseline over the surface of the plastic wrap where the paper will go. Use your fingers and just smear it on and spread it around. You can skip the plastic wrap layer if you don't mind getting Vaseline permanently mixed with the clay.
- Tear up a bunch of paper pieces a couple of inches square. Small strips are good too. Don't worry if they are not all the same, since different contours will need different pieces to cover them properly.
- In a cup or bowl, mix white glue with water until it's thin and runny. A good consistency is like cream, pourable but not watery.
- Dip the brush in your glue mixture and then paint some on the spot where you want the paper piece to go. A thin coating will do - just enough to let the paper stick.
- Dip the brush in the glue mix again and brush the paper piece down on your shape. Be careful at this stage. You don't want loose edges anywhere - they are more likely to catch fire if you use a candle inside for light.
- Make sure you apply the paper on the upper surfaces in such a way that the finished piece can be removed from the clay form. Don't wrap around it too much!
- Apply a layer of paper all over the surface of the shape. Let it dry. Letting the layers dry is the most lengthy part of this process. It's good to have several shapes to work on at once for this reason.
- Once the layer is dry, repeat steps 6 to 9 until you have a thin hard shell of papier-mache on your molds.
- Loosen the shell at the edges of the mold and carefully pry it off.
- Pull the plastic wrap out of the shell as much as you can, and/or wipe out the remains of the Vaseline.
- Attach the pieces to one another using masking tape on the inside. Put your pieces together using more paper and glue on the outside. Support them on wadded-up pieces of newspaper so they stay in position until they are dry.
- Remove the masking tape to avoid silhouettes of the tape shapes in the shell.
- Using coloured tissue paper or transparent colour, decorate your lamp.
- Mount it on your base and install the lighting.