Granted, when you think "plastic lanterns" the first thing that comes to mind might be cheap, chintzy garish mass-produced crap.
And you'd be right.
There are some truly hideous examples of plastic abuse out there, ugly, nasty wastes of our precious natural resources, but we know better.
We will consider the practical aspects of plastic, the intelligent and aesthetically pleasing reuse of items that cost next to nothing, especially if you fish them out of the recycling. You can use various things, including pop bottles and plastic packing tape.
The advantages of plastic
Plastic is waterproof. It is sturdy. It bounces when you drop it (well, the kind we're likely to use for this project will). It's cheap. Or free, if you root through someone else's recycling bin. It stands up very well to abuse by children and drunken adults. Lit with glow sticks, plastic lanterns can be used indoors if open flames are forbidden or just a Very Bad Idea.
Pop Bottle Lanterns
It's possible to make a lantern out of a clear plastic pop bottle.
| Here's an example of a lantern made from a small plastic pop bottle. It's a messy job - the spots everywhere are drips of the glue mixture used to adhere the paper. You need that table cover! I used a heavyweight garbage bag clipped to my bench. Worked like a charm. | 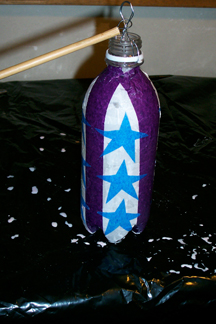 |
Materials:
- A clean plastic pop bottle. A small one can be used without removing the top. See here for photos. The 2-litre size is great, but may require more glow sticks for a brighter light.
- Scissors
- Craft knife
- Fine sandpaper or an emery board
- Tissue paper, assorted colours
- White glue (Elmer’s or Bondfast)
- Water
- Small cup for the glue mix
- Small paintbrush
- Single-hole punch or awl
- Wire
- Waterproof, wipable table covering (vinyl is best - use an old tablecloth or shower curtain to cover the work surface. Newspapers will do in a pinch.)
- Glow sticks
- Sticks, dowels,or bamboo poles for carrying

What to do:
Note: If you use a small size bottle, steps 3 to 6 can be skipped.
- Cover your work area with newspaper or a tablecloth (vinyl protects best) and lay out your supplies.
- Wash, rinse, and dry the bottle. It needs to be clean. It's best to use the kind of bottle where you can easily remove the label. Paper label residue is hard to get rid of.
- Take your pop bottle and make a horizontal slit in the side of the bottle where it starts to curve towards the opening. Use the craft or utility knife. Make sure the slit is big enough so you can insert the blade of the scissors.
- Using the scissors, insert the blade into the slit and cut off the top of the bottle. Throw it in the recycling.
- Using the fine sandpaper or emery board, sand the cut edge of the plastic. This is optional, but might reduce the risk of scrapes when placing your light inside.
- Take the punch or awl and punch two holes about 1/4 to 1/2 inch from the cut edge of the bottle. Make one hole on each side to attach the wire handle.
- Choose your tissue paper. If you like to work from a sketch, fine. Some people like to improvise as they go along. Tear the tissue into smaller pieces. Don't worry about shapes too much - you'll be piecing things together and doing lots of overlapping, and everything will be stuck down with glue.
- Take your glue cup. Fill it with a 50/50 mix of water and white glue. Stir the mixture until it's completely mixed into a thin, runny consistency.
- Using the paintbrush, paint a little of the mixture onto the bottle. Lay the tissue on the glued part. Paint over the whole piece of tissue, going out onto the plastic on all sides.
- Keep applying pieces of the tissue in whatever pattern you choose. Try overlapping colours to create new ones. Keep brushing the glue mixture over the surface so you don't have loose edges sticking out. Make a collage with the tissue paper. It may be easier to make stripes, for example, by applying several smaller pieces rather than one long one,depending on your skill level.
- When you've covered the lantern as much as you want to, seal the entire papered surface with a coating of the glue mixture. White glue dries clear so it will be like a varnish.
- When you've completed the lantern, let it dry overnight.
- When the bottle is dry, cut a piece of wire for the glow stick hanger/lantern hanger (see the photo). Bend it so there is a loop to hang the glow stick on and then twist it for an inch or two. Make another loop for hanging or carrying, and twist the free ends along the same area where you twisted before. Bend the two ends out to the sides and thread them through the holes in the lantern. Twist the loose ends onto themselves to secure them in the holes and keep the loose wire ends from poking anyone.
- Crack a glow stick and shake it up. Hang it inside the lantern on the wire hook. Bend the hook a little so it doesn't come loose as you move the lantern around.
- If you use the smaller sized bottle and don't remove the top, you can wrap a strip of paper, card, or even coloured tape around the top and bottom of the bottle for an extra finished look.
- Carry the lantern by its handle or hang it on a stick or bamboo pole. Use the Pole Loop to attach it to the stick.
WARNING - DO NOT USE CANDLES FOR PLASTIC LANTERNS - THEY WILL BURN AND MELT. MELTED PLASTIC CAN CAUSE SERIOUS BURNS.
Packing tape sculpture
Ordinary clear packing tape is fairly easy to mold into a hollow sculpture - there's an informative video here.
Materials:
- A form to build your shape on - a doll, ball, vase, or other item that will hold its shape as you apply layers. You can build larger shapes out of chicken wire, but watch out! Chicken wire is nasty to work with - lots of sharp wire ends to scratch and poke as you work. There are a few tips on forming wire, including chicken wire, here.
- Plastic wrap - any cheap house brand will do. It is only to prevent the tape from sticking to your form. It is stretchy enough to mold easily around curves and sticks to itself enough to let you have both hands free to manage the tape.
- A few rolls of clear packing tape. You can buy it in bulk at places like Staples.
- A craft knife to slice the finished wrap off the form.
- Lights to go inside. If you have access to a power source, use mini lights on a cord, which can sometimes be found in the holiday decorations section of department stores, Canadian Tire, Home Depot and so on. Glow sticks work well with these, but give a slightly harsh "neon tube " effect that you may or may not like.